This GNS3 Tutorial was written so others can benefit from my long hours trying to make the 32 router INE CCIE troubleshooting topology work in my GNS3 environment.
Note: This post is probably out of date for many readers, I am now focused on Network Automation using Ansible & Python – Check out my Ansible Training
Check out these post – What is Ansible and what is it used for?
This tutorial is based on running GNS3 on Ubuntu, I know many people run GNS3 successfully in Windows but I have always found Ubuntu to be more stable and efficient with memory.

Below is the 32 router topology that I am going to be running in my GNS3. This was created by Brian Dennis to accompany his 5 day CCIE troubleshooting bootcamp.
The .net files can be downloaded from here
GNS3 Tutorial Stage1: Install GNS3 Ubuntu
For this GNS3 tutorial I am going to assume some knowledge in building a VM from an iso, if you need to find out more info about that there is a nice tutorial here
I chose to run Ubuntu server 64 bit, you can download the iso for that here
I am running my Ubuntu server on a VMWare ESXi 5.1 host running on HPc7000 blade server. It has it’s own host and dedicated 16Gb ram and 4 processors.
This is probably more hardware than you really need and I have successfully run GNS3 on my laptop for many years, but for this topology I wanted to have a bit more horsepower. All the principles and tuning remain the same, whatever hardware you are running on.
I have successfully run small topologies on a Dell laptop with 4GB ram on a virtual ubuntu desktop running in VMWare workstation. I will post another tutorial on that setup later.
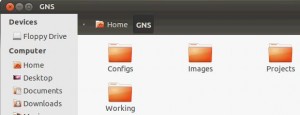
So once you have your Ubuntu server iso and have built your VM once you have started it you need to prepare it for GNS3. I create 4 simple folders in my home directory. Configs, Images, Projects, Working. It looks like this.
IOS for GNS3
The next thing on this list is to get a router ios to run in GNS3. I am studying for my CCIE so need to run a 12.4T image. I would recommend for stability you run a 3725 image or a 3600 image. Try to avoid running 2600 images as they tend to be unstable. I run c3725-adventerprisek9-mz.124-15.T10
Now I cannot tell you where to get this ios from as you should have a valid support contract with cisco to be able to download the appropiate ios for your router, google is your friend on this one.
Top tip #1 convert .bin to .image
The first top tip to make your GNS3 install run smoothly is to convert your .bin file to a .image. The .bin file is a compressed file and when you start a router it has to uncompress the file to run it that is why you see the
############################# when you start a router. If you already have the file unpacked then your routers will boot a lot quicker. Simply open the .bin file with something like Winrar and export to your desktop. Once you have exported the image rename it so the extension is .image for my image the size increased from 44Mb to 93Mb. You then need to copy this .image file into the Images folder on your server.
Once you have the image in your image folder you need to install GNS3
Install GNS3 Ubuntu
This GNS3 tutorial assumes you have a basic knowledge of Ubuntu and can install a package. If not, installing GNS3 is very easy using the software center
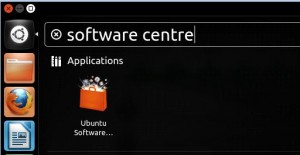
Click on the dashboard icon top left

Then search for software center
Click on Ubuntu Software and then search for GNS3
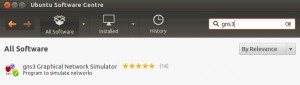
Now click on the Install button and Ubuntu does it all for you, after the install you should now have a GNS3 icon in your taskbar.
Click on that and GNS3 will start up, if you have already placed your image file in the images folder all you have to do is point GNS3 to that image and make a few other tweaks and you should be good.
Top Tip #2 create a baseconfig
One of the things that will hog the resources on GNS3 is the console ports, simply putting exec-timeout 0 0 into the config will reduce this a lot. There are also a few other commands which you should have on every device, and these can be automatically added to every device when they start with the baseconfig file.
To create a baseconfig go into your configs folder and create a new text file, put the following lines into the file
!
hostname %h
no ip domain lookup
line con 0
exec-timeout 0 0
logging snychronous
Save this file as base.txt
From the top menu select Edit / IOS Images and Hypervisors, you should see a scree like this
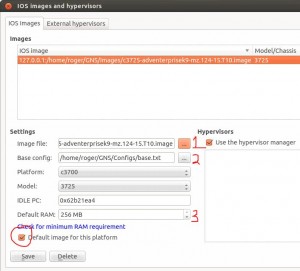
1: First click on the button next to Image file and locate your image file, which should be in your images directory
2: Next click on the button next to Base config and point to the baseconfig text file you created earlier
3: Set the default ram, this will depend on how much ram you have and how many routers you want to run.
If you are only going to be running 6 routers and you have 2Gb ram in your machine then setting this to 128MB will be fine, if you are planning on running the 32 router topology from INE you are going to need the RAM to support it. I have mine set to 256 but I have 16Gb of ram in my machine so could support 64 routers at a push.
Ignore IDLE PC for now this is going to be set later
Click save and close.
Hypervisor Manager
There is one setting that I do adjust and that is the memory limit per hypervisor. The hypervisor is what actually runs your routers and once you have used the memory limit set in here, GNS3 will start a new hypervisor.
If you click on Edit/Preferences then select Dynamips and then Hypervisor Manager
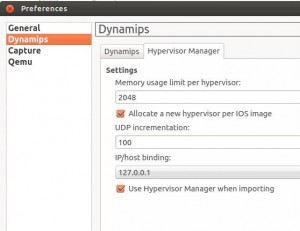
This defaults to 512 but I increase mine to 2048 then click ok and you are ready to set the idlepc value
GNS3 Idle PC Value
One of the most important settings in GNS3 is the idlepc value. Basically when you start up a router is uses a lot of CPU and then once it has started it settles down, you need to tweak GNS3 so that when the router is in its started state and the CPU is running at about 1-2% that you set the idlepc value to match this. Otherwise GNS3 keeps giving the router a lot of CPU and that will just kill your system.
To set the idlepc value simply drag one router into the topology, start it and after a couple minutes right click on the router and select Idle PC, it will probably warn you that one is already set, just click ok and wait. After a few seconds you will be offered potentially better idlepc values. You then need to select the one with a * next to it.
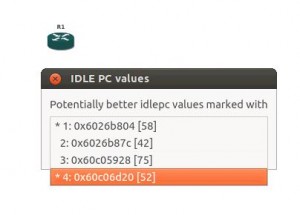
There is no real science to this, you just pick one of the values and see if your CPU drops. If you hit a good value your CPU usage will drop from about 90-100% to under 10%
So you have now tweaked GNS3 you can start building your topology.
Importing .net file
If you already have a .net file and associated configs, created by someone else then you can easily import that into GNS3 and run their topology very easily. For this GNS3 tutorial, I am going to use the INE CCIE troubleshooting 32 router topolology.
Once you have downloaded the .net file and config folders you need to put this into the projects folder you created earlier. In the files you will see the topology.net file. This file was created on another computer so you will have to make a few adjustments for it to work on your setup.
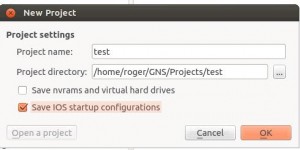
You first need to understand the path of your working dir and of your image file, the easiest way to do this is to create a one router topology make one change to the router and save the project as test. You will then have a new topology file for your one router topology with the correct paths which you can reference in a minute.
To save your project click on File save project as and ensure you have save IOS startup configurations set.
You should now have 2 topology files in your system the test one that works on your system and the INE imported one that doesn’t.
Navigate to your projects folder and open the test folder and then open topology.net with a text editor scroll through the file and note the locations of workingdir = and image =
All you have to do is do a find and replace on these values and replace the working values in your test topology file to with the ones in the imported file.
Save the file and start your topology.
It should run like a dream.
I hope this GNS3 Tutorial has been of some use to somebody and as always please comment below if you want any questions answered.
Now I have passed my CCIE I am working on other projects and also working as a Magician in Southampton!

Hello Roger!
I am just starting my CCIE R&S journey. I have the written exam booked for November but already looking for lab options because I live in a third world country and Cisco equipment is just too expensive, and I also can’t spend a year worth of my salary in rack rentals.
Do you think than this GNS3 option combined with the ESXI will be enough for the lab? I probably will have to rent a rack eventually but those options will save me a lot of pain, considering i have to pay for the exam and the flight ticket!
Also, do you think the GNS3 option is still valid as of 2015?
Just looking for some pointers as the amount of information out there is overwhelming.
Regards,
Carlos
Carlos,
If you have an esxi server then you need to run up some CSR1000v routers – this is a better option for full scale labs – my tutorial here
https://www.rogerperkin.co.uk/ccie/ccie-virtual-rack-csr-1000v-routers/
However if you are just starting your journey there is so much you can learn with GNS3 with just 3 or 4 routers the key is to keep learning and never give up.
Thank you so much! Although my written exam is in November, I will get into the GNS3 lab right now. Thank you so much for this and also the ESXI tutorial.
Best Regards,
Carlos